I love solving problems for our customers and finding solutions to technical challenges, no matter what they are. And so it was that I started on this journey to help a customer build an event driven process to upload files from AWS to SharePoint Online. While I do spend a good bit of time lamenting SharePoint (in a jovial fashion of course) in this post, it was all worth it in the end, and I might even confess to enjoying myself on the whole.
So our story begins……..
It was something of a “please, no, anything but this” moment, when a customer asked me whether I could help them with a solution for a SharePoint integration. I mean, take my eyes, maybe even one of my hands too, just please don’t make me work with SharePoint. Anyway, I digress. This was an on-premise workload being moved to AWS, in a lift and shift fashion. In on-premise land thousands of reports, generated on a daily basis, were being made accessible to users via an on-premise SharePoint environment. SharePoint still needed to be in the mix, just the cloud based version aka SharePoint Online.
So, in summation, the requirement – EC2 instance(s) generating 2000+ PDF reports per day, that need to be uploaded to a SharePoint online document library.
One might argue that this should be moved to just use S3 storage, or migrate the reports to some sort of interactive platform (viva la QuickSight), but at this juncture that simply was not an option. So, SharePoint Online and a missing hand it is. Hang on a minute, why am I losing a hand as well as having to work with SharePoint? That wasn’t the deal.
Proposed Solution
Having overcome the loss of limb, I proceeded to come up with a cunning plan. Event driven and serverless it shall be.
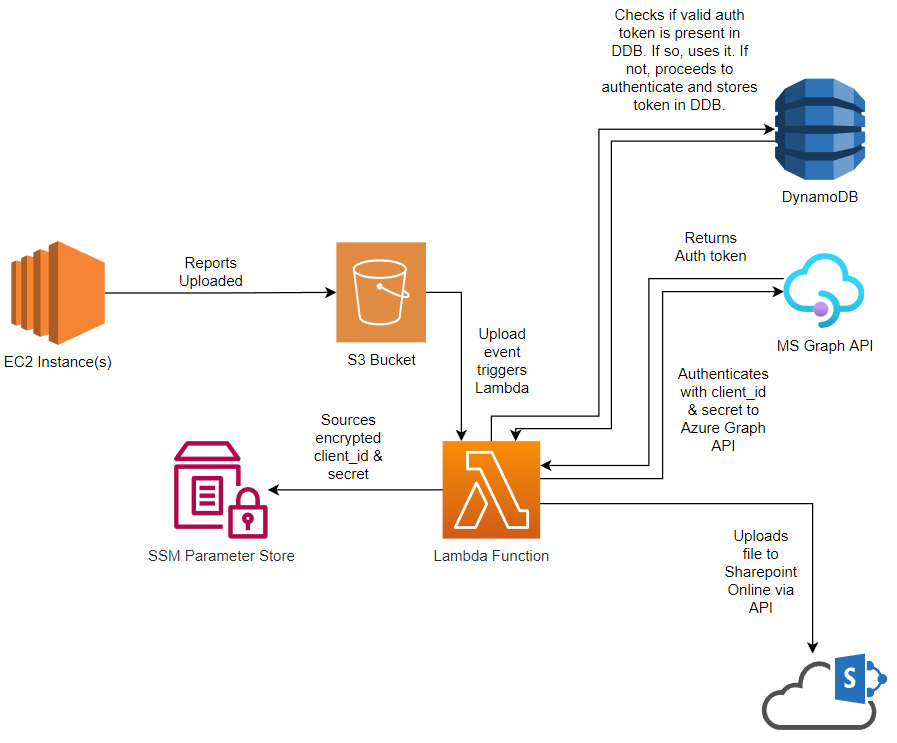
The initial design didn’t include DynamoDB, but through testing I found that the access tokens returned by the Azure Graph API are valid for 1 hour. With potentially hundreds to thousands of concurrent executions it certainly makes sense to store the tokens and reuse them, to reduce the amount of requests we need to make to the Azure Graph APIs.
So, it looks pretty, could even be quite fun to build. Great Scott, did I say fun and SharePoint in the same blog post. What has become of me?
Right, awesome, with a plan in hand I start digging into how one would actually interact with the Microsoft Graph API in order to upload files to SharePoint Online. Cue an extensive period of cursing. This is a little tricky it would seem.
Getting API Access to SharePoint Online
Everything was going so well. The plan looked good, even Baldric would think it was as cunning as a fox who’s just been appointed Professor of Cunning at Oxford University. But wait, Microsoft has other ideas.
After extensive searching and reading what little documentation is available on this topic, it seems that getting suitable permissions to interact with SharePoint via API is not as straight forward as one would hope. It’s fine if you are happy with granting your Azure application access to ALL the SharePoint sites in your estate, but if you only want to grant access to one or more specific sites it gets a little more difficult. In their infinite wisdom, Microsoft have not built a complete UI around this capability or made it possible to configure fully via the Azure admin portal. Because, let’s be honest, that would simply be far too easy, wouldn’t it?
I will summarise the steps one must take as I found it hard to really find this outlined well:
For documentation on creating the Azure AD application, creating secrets and all that, see the Microsoft Docs
- Create an Azure AD application in the Azure admin portal, this will be our admin application
- Generate a secret for the admin application, which you can use for the Oauth2 authentication flow
- Grant this admin application the Sites.FullControl API permission
- Grant Administrative Consent for the above API permissions
- Take note of the application client ID, tenant ID and secret
- Create a second Azure AD application in the Azure admin portal, this will be our client application (ultimately the one used for our solution)
- Generate a secret for the client application, which you can use for the Oauth2 authentication flow
- Grant this client application the Sites.Selected API permission
- Grant Administrative Consent for the above API permissions
- Take note of the application client ID, tenant ID and secret
- Go to SharePoint and get your SharePoint site ID by browsing to the following URL (https://<tenant>.sharepoint.com/sites/<site-url>/_api/site/id)
- Open up Postman (or your HTTP client of choice….curl if you like)
- Authenticate using the client ID and secret for the admin application, using the Microsoft Graph API token endpoint.
curl --location --request POST 'https://login.microsoftonline.com/[tenant ID]/oauth2/v2.0/token' \
--data-urlencode 'client_id=[admin application client ID]' \
--data-urlencode 'client_secret=[admin application Secret]' \
--data-urlencode 'grant_type=client_credentials' \
--data-urlencode 'scope=https://graph.microsoft.com/.default'
This will return an access token, which you will pass with the next request.
Sample response:
{
    "token_type": "Bearer",
    "expires_in": 3599,
    "ext_expires_in": 3599,
    "access_token": "[access token]"
}
- Send a request to the Microsoft Graph API to grant permissions for a particular SharePoint site to the client application. For this step you will need to know the client applications client ID and the SharePoint site id. You use the access token received in the previous step as an Authorization Bearer token. See the API docs.
curl --location --request POST 'https://graph.microsoft.com/v1.0/sites/[site ID]/permissions' \
--header 'Authorization: Bearer [access token (from previous step)]' \
--header 'Content-Type: application/json' \
--data-raw '{
  "roles": ["write"],
  "grantedToIdentities": [{
    "application": {
      "id": "[client application client ID]",
      "displayName": "[client application name]"
    }
  }]
}'
- For security purposes, revoke the secret and permissions of the admin application, or just delete the application if you don’t need it for anything else.
As you can see, that is a long, laborious process just to get some API credentials that have a suitably limited scope of permissions. Why Microsoft, why!?
Onwards & Upwards
Now that we have granted the correct permissions to our application, and we are armed with a client ID, tenant ID, SharePoint site ID and a secret we have everything we need to crack on with building our solution.

Ah ah ah, not so fast. We need to also know the drive ID. In the world of SharePoint Online, your Document Library is treated almost the same as a OneDrive drive, hence it has a drive ID. We will need to find this little tidbit of information in order to know where we are going to upload files to.
To get our drive ID, we can query the Microsoft Graph API’s list drives endpoint. Checkout the Docs.
You need to go back in your memory banks to a little earlier, as we will need an access token to query that endpoint. Fearless blog reader, arm yourself now with your client application client ID, tenant ID and secret and go ahead and grab yourself an access token using the Microsoft Graph API token endpoint. This step also serves to validate that our client app has the permissions expected.
curl --location --request POST 'https://login.microsoftonline.com/[tenant ID]/oauth2/v2.0/token' \
--data-urlencode 'client_id=[client application client ID]' \
--data-urlencode 'client_secret=[client application Secret]' \
--data-urlencode 'grant_type=client_credentials' \
--data-urlencode 'scope=https://graph.microsoft.com/.default'
Now fire that bad boy over to the list drives endpoint as your Authorization Bearer token and sit back in wonder as you finally have the last piece of the puzzle returned.
curl --location --request GET 'https://graph.microsoft.com/v1.0/sites/[site ID]/drives' \
--header 'Authorization: Bearer [access token (from previous step)]'
Time to build!!
Of course, we are not going to build this through the AWS console, it’s time to get our Terraform on……but that’s going to be in part two, because you want to read more about SharePoint right? Of course, you do!